
Construction & Building Solutions
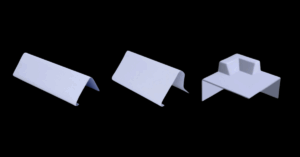
Guide to Choosing the Right Roof Trims
Boost your flat roof’s performance and appearance with the perfect GRP trims. Get expert advice and top product tips in our complete guide.
We value your privacy
Our website uses cookies to enhance your experience. By continuing to use our website, you are agreeing to our use of cookies. Necessary cookies are always enabled. You can read more about our Cookie Policy in our Privacy policy
We value your privacy
Strictly Neccessary
Essential cookies enable core website functionality, such as secure logins and preference settings, without tracking personal activities or collecting data for ads. They ensure the site's proper operation and legal compliance, remaining always active
Preferences
Preference cookies enhance your browsing by remembering settings like language and regional preferences, tailoring the site to your needs without tracking activity across other websites
Statistical
Statistics cookies gather anonymous data on site interactions and page visits to help improve functionality, ensuring a smoother user experience without personally identifying users
Marketing
Marketing cookies are used to identify visitors across different websites, such as those operated by content partners or ad networks. These cookies allow companies to build a profile of a visitor’s interests and preferences, enabling the delivery of personalized ads that are relevant and engaging on other websites.
Cookies are small text files stored on your computer by websites you visit. They help users navigate websites efficiently and enable certain essential functions.
Cookies necessary for the website to function properly can be set without your consent, while all other cookies require your approval before being used in your browser.
Additionally, we use cookies to gather data for personalizing and evaluating the effectiveness of our advertising.
For more information, please refer to the Google Privacy Policy.
You can find the list of all the cookies that we use on our website here.
Advice for Applying Fibreglass in Winter

When working outdoors during the winter months, you’ll face three main challenges: cold temperatures, wet weather, and shorter daylight hours. While these conditions can make the job more difficult, applying fibreglass in winter is still entirely possible. With the right knowledge and a bit of planning, you can achieve a successful installation.
Beyond just bundling up against the cold, follow our straightforward checklist to make the most of your fibreglass materials and ensure a smooth winter application.
When applying fibreglass in winter, preparation is everything. Always check the local weather forecast before starting work. It’s a good idea to have a reliable weather app installed on your phone for quick access.
Next, check the temperature. Avoid starting any fibreglassing work if it’s below 5°C, as the resin won’t cure properly. Use the catalyst addition chart to determine the correct percentage of catalyst needed for your resin mix.
In winter, plan your work carefully around daylight hours. Avoid fibreglassing or applying topcoat after 2–3 pm, as the sun’s heat plays a key role in the curing process. Once the sun sets, curing slows dramatically or may stop altogether, which can ruin the finish. Uncured surfaces are also more likely to collect debris, which will need to be removed later.
Before laying fibreglass, check the temperature of your boards, resin, and topcoat. If the ambient temperature is below 10°C, store the resin in a warm room overnight to prevent it from thickening or freezing. Cold resin is much harder to work with and may not cure correctly.
If it begins to rain while you’re working, stop immediately and cover the roof with a Visqueen sheet to protect the surface from water damage.
If you’ve laid a deck but can’t begin laminating right away, seal the surface by coating it with catalysed resin. Make sure to cover all exposed edges to prevent moisture from seeping in. Then, use a Visqueen or polyethylene sheet to protect the edges and any uncoated boards.
When you’re unable to laminate over a prepared deck immediately, apply catalysed resin to seal the surface and stop moisture uptake until you’re ready to lay the laminate. Don’t forget to cover all vulnerable areas, especially roof edges and exposed boards, with a protective sheet.
Before laying the laminate, always make sure the deck or substrate is completely dry. Sweep away any standing water and use dry cloths to absorb the remaining moisture. Let the roof dry naturally, or speed up the drying process by wiping the surface with acetone.
In colder weather, resin thickens and becomes harder to work into the glass. Be prepared to use more effort—and possibly more resin—during application.
Finally, never begin roofing work if rain is in the forecast.
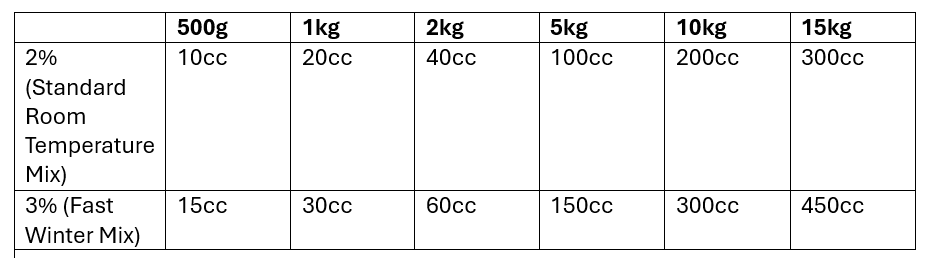
1gm of catalyst = 1cc
Using a fast mix will help speed up curing times in winter. Blowing warm air onto the area is also possible to help if necessary. If you need help measuring the catalyst, we also offer a catalyst dispenser which will provide an accurate measurement.
Boost your flat roof’s performance and appearance with the perfect GRP trims. Get expert advice and top product tips in our complete guide.

Roofing resins like Original GRP, HPX, MultiFlex, Polyurethane, and Acrylic offer unique benefits for residential and commercial properties. Learn about the advantages, applications, and features of each resin type to choose the best option for your roofing needs.

Upgrade your roof with quality materials for lasting performance and appeal. Explore the advantages of fibreglass kits. Read the full article now.
Fibreglass Roof Kits are becoming a top choice for homeowners seeking a durable, energy-efficient, and low-maintenance roofing solution. In this post, we explore the key benefits of fibreglass roofing, from easy installation and sleek aesthetics to long-term cost savings and